 How to Connect to the GoPiGo3 with the Raspbian for Robots Operating System
Raspbian for Robots allows you to access the Raspberry Pi Desktop in your Browser. Accessing the Pi without a monitor and a keyboard is a bit of a complex task. Raspbian for Robots hides this complexity so you can get directly to the good stuff: programming your robot.

CAUTION:
Raspbian for Robots is for advanced users. If you are new to the Raspberry Pi or using the GoPiGo3 for Education, we recommend using DexterOS. Click here to see how to connect using DexterOS.
Getting Raspbian for Robots
You can download Raspbian for Robots for free: here’s how.
Connect over Ethernet
You’ll want to get your GoPiGo connected to wifi so you can program it remotely. It also has to be connected to the internet through wifi in order to run any software updates. Perhaps you have changed locations and need to get the GoPiGo connected to a new network. The best way to do this is to first connect the GoPiGo directly to your computer with an ethernet cable.
Step A. First, sure that the microSD card is in properly, the batteries are fully charged, and the battery pack is securely plugged into the GoPiGo3.
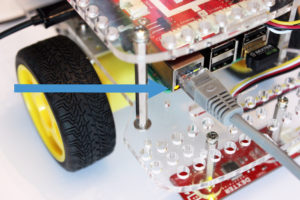
Step B. Next, plug the ethernet cable into the Raspberry Pi (green board) and the other end of the ethernet cable into your computer (through an adapter if you don’t have an ethernet port on your computer). With the power on, you should see the lights next to the ethernet port flashing like in the picture below:
Step C. Now open a web browser (Firefox if you are using a touchscreen Windows laptop), and type in “http://dex.local” in the address bar.
Step D. Click on the “VNC” icon. You will be prompted for a password, type in “robots1234”, and hit enter.
Step E. You should see the Dexter Industries desktop.
SET UP WIFI
Step F: Double-click on the icon “Wifi Setup”. You will connect the robot to your home wifi network (or whatever wifi network your computer is using).
Step G: Select the “Manage Networks” tab.
Make sure the first field of Adapter is set to “wlan0”.
Step H: Press the “Scan” button on the bottom right of the window. Make sure the first field of Adapter is set to “wlan0”.
A new window will pop up that shows the wifi networks in range.
Step I: Select your home wifi network that you want to connect to. In our example, we are connecting to “Chennai 2.0”. Double click the name of the network you want to connect to.
A dialog box will appear with the name of your wifi network.
Step J: Enter in your PSK (wifi password). When done, press “Add”. This window will close. You may see the scan window still open, and you can close it.
Return to the other main window, and in the “Manage Networks” tab we should see the name of the wifi network we just chose in the list.
Step K: Click on the tab “Current Status”. You should see your network. After a minute or two, you should see the Status as “Completed”.
You should then see the IP Address appear. This may take a few minutes, that is normal.
If the network appears to be attempting to connect and reconnect, try re-typing the wifi network psk (password). To do this, go to Manage Networks tab and double click on the network to pull up the password window.
After connecting to the wifi network, let’s verify that wifi is really connected (to the internet).
Step L: Double click the “LXTerminal” icon on the Desktop.
Step M: In the terminal type “ping dexterindustries.com”. You should see the data returned from the address that looks something like this picture. Press “control+c” to stop it.
Step N: The final step is to shut down and restart the robot. Do this by double clicking the desktop icon that says “shutdown”.
Step O: Click the YES button.
Step P: Remove the Ethernet cable from the Raspberry Pi.
Next, just make sure that your computer is still connected to the same wifi network you just connected the robot to in the last step when we set up the wifi.
Step Q: Wait a minute for the lights on the robot to go off and then turn the GoPiGo OFF. Wait a minute and then turn the GoPiGo back ON with the switch.
Now the Ethernet cable is totally disconnected, and the wifi should be set up on the GoPiGo, so in order to test this, we are going to “ping” it and make sure the computer can still see it through the wifi.
Open up Terminal (or Command Prompt if you are using a Windows PC) on your computer again and type “ping dex.local” and see if you get that big response again (“64 byte…”).
Press “control + c” to quit again. If you got a response, it means you have set up the wifi correctly on your robot!
Now, whenever you boot up your robot, it will automatically connect to the wifi network you chose in this setup.
You are Connected!
Move on and explore how to Program the GoPiGo here.
Have a question or a suggestion? See our Raspbian for Robots Support page. Or, ask on the forums here.


