 In this section, we’ll go over some built in resources for testing and troubleshooting the GoPiGo3, including common and frequently asked questions about the GoPiGo3, as well as tips for troubleshooting the most common issues.
How to Update the GoPiGo3 Firmware
DexterOS

DexterOS updates the GoPiGo3 firmware on each boot. In order to get the latest version of the firmware, you may need to update DexterOS using the USB Drive method.
Raspbian for Robots and Cinch
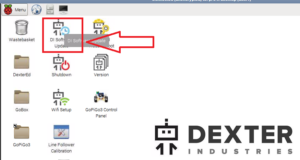
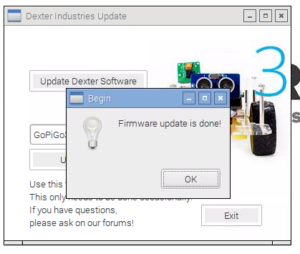
You can update the GoPiGo3 Firmware from the Desktop by clicking on the “DI Software Update” icon.
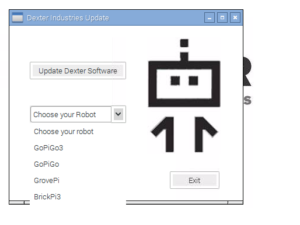
When the update program starts, select “GoPiGo3” from the drop-down menu, and click “Update Robot”.
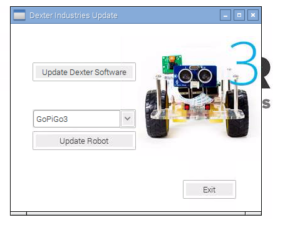
After the robot is firmware is done updating you should see the message “Firmware update is done!”
From the Command Line
You can update the firmware from the command line if you’ve installed the GoPiGo3 on your Raspberry Pi. First, update the software directory from Github:
cd ~/Dexter/GoPiGo3

sudo git fetch --all
Next, run the command:
sudo bash ~/Dexter/GoPiGo3/Firmware/gopigo3_flash_firmware.sh
This should update the firmware with a positive response at the end “** Verified OK **”
Running a Hardware Test
The GoPiGo3 comes with a hardware test. If you think something might be wrong with your GoPiGo3, we invite you to the forums, where we are quick to answer questions and help you get your robot going. One helpful piece of information is a test log. This can be generated using a Desktop icon on Raspbian for Robots, or in the command line.
Run a Hardware Test from the Desktop
You can run a hardware test from the Desktop on Raspbian for Robots, our operating system for the Raspberry Pi.
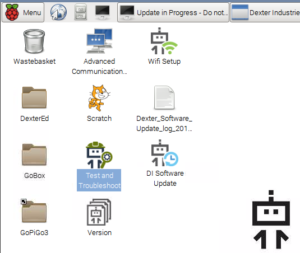
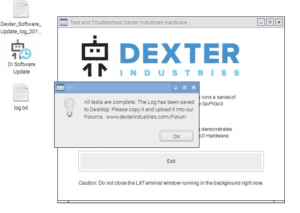
Click “Test and Troubleshoot” on the Desktop and the program will open. Turn your GoPiGo3 upside down: the program will be moving your wheels!
Next click “Troubleshoot GoPiGo3”
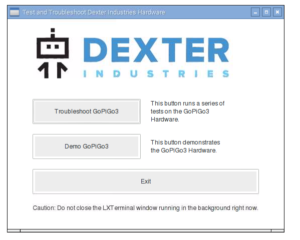
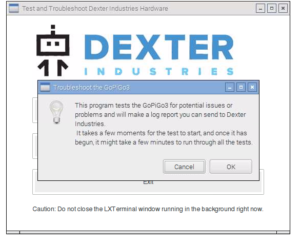
This should create a test log on the desktop called “log.txt” with information about your hardware test.
Run a Hardware Test from the Command Line
Run the command sudo python /home/pi/Dexter/GoPiGo3/Software/Python/Examples/Read_Info.py and paste the information into your forum post. This command will produce general information about the GoPiGo3 hardware, including Firmware Version, voltages, and other vital information for helping you troubleshoot any issues with the GoPiGo3.
Common FAQ
The GoPiGo3 Wheels Won’t Turn.
The GoPiGo3 wheels will stop turning when the battery voltage is too low. Check that your battery is plugged into the GoPiGo3, and make sure you have fresh batteries.
Should I Take the Protective Foam Off My Pins?
Yes! Be sure to take the foam off of the pins on the GoPiGo3. The GoPiGo3 is shipped with foam on the GPIO pins to prevent them from being bent. Be sure to remove them before proceeding to use your GoPiGo3!
The GoPiGo3 batteries seem to run down fast.
You can save battery life on the GoPiGo3 by plugging in the USB power on the Raspberry Pi while GoPiGo3 is stationary. The vast majority of time spent working with the GoPiGo3, the robot is motionless. You can save battery power by plugging it into a Raspberry Pi Power Supply while programming! When you’re ready to drive, just remove the USB power.
Sharing Your Project and Getting Help
After you have completed all the steps above, you can check out the Examples and Projects that we have made and try them out yourself or make something cool and share it with our community.
Have a question or a suggestion? Ask on the forums here.


